
Filevine users can send a payment request link for a finalized invoice to a client through email from Filevine itself, or directly collect a payment from the Payments by Filevine application (Payments App).
Before you can begin using the Payments App, you must add an account.
Access
Account Admins can manage user access to Payments in the User section of the Account Manager tool. Once an Account Admin gives you access, you can access the Payments App using one of the following methods:
-
Profile picture dropdown: In Filevine, select your profile picture in the top right, and then click Payments from the dropdown menu.
-
Billing Advanced tool: In Filevine, click Main Menu > Advanced > Billing, and then select the Payments button in the top right corner.
Overview
The Payments App has the following sections:
- Transactions: view a list of your transactions, separated into “Pending” and “Completed” tabs. You can also view any disputed charges in this section.
- Recurring Transactions: view a list of recurring transactions configured for your organization, and update or disable transaction cadences.
- Accounts: view all bank accounts you’ve set up within the Payments App, and add new accounts.
- Clients: view all clients you’ve interacted with using the Payments App. You can also add cards on file for clients from this page, which allows you to charge the card without making a payment request.
- Bank Activity: view pending and completed payouts and processing fees. You can filter by time range or by account if desired.
- Trust Reconciliation: view a report showing which transactions are tied to which payouts for your trust accounts.
- Settings: choose which payment methods to allow, set up an account to pay processing fees, and change your client-facing business name.
Create a Payment Link
There are four ways to request a payment:
| Request Type | Created From | Can be Used For | Expiration |
|---|---|---|---|
| generic link | Payments App | post on a website or in an email signature so that clients can make payments of any amount | none |
| ad hoc link | Payments App | include when communicating with a specific client | 90 days |
| invoice-specific link | Filevine |
after an invoice is finalized, email it to the client through Filevine Note: This link has additional options to allow clients to partially pay, or pay multiple invoices in one transaction. |
90 days |
| project-funds-specific link | Filevine | request an initial trust or retainer payment, or an additional payment to top off project funds | for requests for specific amounts, 90 days; for open-ended requests, none |
Generic
A generic payment is created for a specific account, which the payment will be made to, but it does not require you to specify a customer or an amount. Because this type of payment does not require the payor or amount to be specified, and the link does not expire, this request type can be used to post on a website or in an email signature.
To generate a generic payment request, select the Accounts section in the Payments App. Find the account you’d like to generate the request for, and click on the vertical ellipsis. Select Get Payment Link.
In the flyout, you can view and copy the generated generic link for this account.
Because generic payment links are not linked to a specific payor, the “payor” field in the transactions list will not list the payor as with the other request types. Instead, they may have a “suggested payor” option, where the Payments App suggests the likely payor, based on the contact information entered in the transaction and on Filevine contact information. Open the transaction’s flyout and click Accept to select the suggested payor.
Ad Hoc
An ad hoc transaction is created within the Payments App, and can be used to collect a payment from a client at any time—even without an invoice. These transactions require you to specify an account, customer, and amount. You can either send a payment request to the client or manually charge the client’s payment method on file.
To create an ad hoc transaction, click + New Transaction in the top left corner of the Payments App.
In the New Transaction flyout, choose whether to Request Payment or Charge Card. Select an option from the list below to learn more.
Request Payment
To generate an ad hoc payment link to send to a client:
- Select an account. In the Account field, find and select the desired bank account to deposit the client’s funds once received. To add a new account, navigate to the Accounts section of the Payments App.
- (Optional) Enter a reference ID. If desired, use the Reference ID field to enter a unique identifier for the transaction. If this transaction will be applied to an invoice, it’s recommended to enter the invoice number in this field.
- Add payor details. In the Payor ID field, enter a unique identifier for the client. Typically, the client’s email address is used as their ID. In the Payor Name field, enter the client’s name.
- Choose One-Time or Recurring. To request this payment only once, select One-Time. To request this payment at regular intervals, select Recurring, and then select the Frequency, Day, and Start and End Dates. Payment links will be automatically generated on the specified cadence.
- Add the amount due. In the Amount field, enter the amount to collect from the client. By default, the client can only complete the transaction by paying this entire amount. If you’d like to allow the client to pay a partial amount, toggle on Allow partial payment.
- Click Create.
Once created, you’ll see a confirmation message and a link to the payment link. Click Copy Link to send the payment request to your client via your preferred method of contact.
Charge Card
To manually charge the payment method on file for a client:
- Select an account. In the Account field, find and select the desired bank account to deposit the client’s funds once received. To add a new account, navigate to the Accounts section of the Payments App.
- (Optional) Enter a reference ID. If desired, use the Reference ID field to enter a unique identifier for the transaction. If this transaction will be applied to an invoice, it’s recommended to enter the invoice number in this field.
- Select a client. In the Client field, find and select the client to charge. This field only displays clients with a payment method on file. To add a new client, or to add a payment method for an existing client, navigate to the Clients section of the Payments App.
- Choose One-Time or Recurring. To collect this payment only once, select One-Time. To collect this payment at regular intervals, select Recurring, and then select the Frequency, Day, and Start and End Dates. Charges will automatically be processed on the specified cadence.
- Add the amount due. In the Amount field, enter the amount to collect from the client.
- Click Create.
After a few moments, you’ll see a message in the bottom left corner indicating whether the transaction was successfully processed.
Invoice-Specific
Invoice-specific links are created from within Filevine (rather than within the Payments App). They can be created once an invoice has been finalized, and will be connected to that invoice.
Tip
For this link type, users with access to the Billing Setup Advanced tool have the option to allow clients to make partial payments, or apply their payment to the full project balance, across multiple invoices. Learn more.
The account listed is the default account chosen for invoice links, the customer name used is the project’s main contact, and the amount shown is the full amount of the invoice. Payments made using invoice-specific links will be posted back into Filevine, appearing under either Transactions (for operating accounts) or Project Funds (for trust accounts).
Payments made via these links are deposited in the account selected in Filevine. This account can be chosen at the Org level in the Billing Setup Advanced tool’s Payments tab, or overridden at the project level in the project Billing section’s Settings tab.
Send By Email
In the menu along the top of the invoice, click Send, and select Send By Email from the dropdown. The project’s billing contact(s) will receive an email with the invoice PDF and payment link included. To learn more, read the Emailing Invoices article.
Open Payment Link
In the menu along the top of the invoice, click Options ⋮ and select Open Payment Link.
This action opens the invoice-specific link in the payment portal. If partial payments are enabled, choose the amount to be paid. Then, enter the client’s payment information, and review and submit the payment.
Project-Funds-Specific
Project-funds-specific links are created from within Filevine, in the Project Funds tab of the project’s Billing section. These links use the default account for project-funds-specific links, and the customer is the main project contact.
Payments made using these links will be posted back to Filevine, appearing in the Project Funds section.
To generate a project-funds-specific payment link, navigate to the Project Funds tab in the project’s Billing section and click Request Payment.
In the flyout, select Request Specific Amount or Open-Ended Payment Link. The first option sends a request for the amount you enter, and expires in 90 days. The second option allows clients to pay any amount, and does not expire.
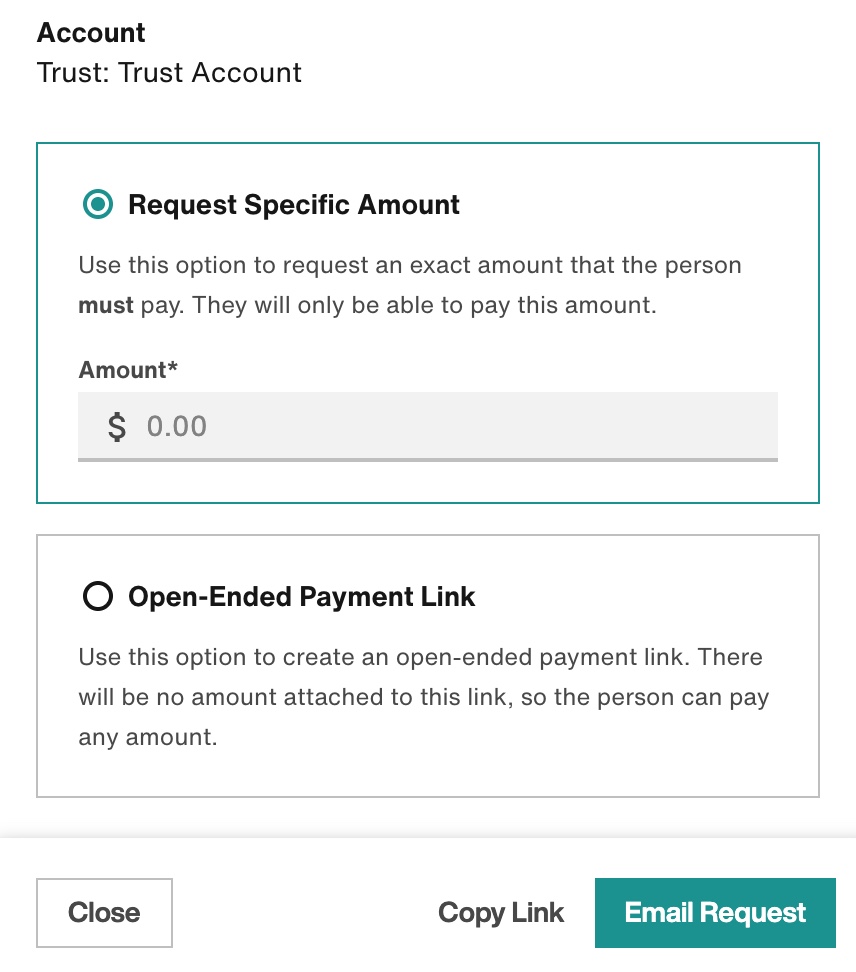
Click either Email Request or Copy Payment. Emailing the request will send an email with the link to the main project contact. Copying the link will enable you to send the link in another manner, or to use the link yourself so that you can fill out the payment information on behalf of the client.
Pay
On the payment submission screen, the user can enter payment information and make the payment.
The account, amount, and payment ID will already be filled. (If you are using a general link for the account, you can fill in the desired amount.) The invoice can be repaid using:
- a card
- A bank account (ACH)
- pre-authorized debit
- Google Pay
- Apple Pay
The user’s information will be authenticated and saved.
When a Payment is Made
Once a payment is made:
- the transaction appears in the “Completed” tab of the Transactions section within the Payments App
- an email is sent to both the payor and a designated contact at the law firm. The law firm contact is set within the Filevine Payments Settings page as the Business Email
- For invoice-specific links:
- the associated invoice in Filevine will be updated to “Paid” status
- the payment is reflected in the Filevine project’s Payments & Transactions (or Project Funds for trust accounts)
- for project-funds-specific links:
- the payment is reflected in the Projects Funds tab of the Filevine project (provided the default account is a trust account)
Comments
0 comments
Article is closed for comments.